

What if meat that looks frozen tells only part of the story? In a frozen meat cargo defrosting and refreezing transit claim inspection, appearance alone can’t establish when temperatures changed, how long an excursion lasted, or what caused it. Start with a documented timeline that connects observations to shipment and temperature records.
It’s understandable to focus first on the product. But unloading, handling, sampling, or disposal can quickly change its condition and erase useful evidence. Record what you observe separately from conclusions about cause or food safety, and preserve temperature records and transport documents before they’re lost.
This checklist explains how to document cargo condition, organize temperature and transit evidence, and build a clear claim file for assessment. Learn what to record before the meat is moved, which documents can help establish the cold-chain timeline, and how to note gaps or conflicting details without guessing. A well-organized account supports informed cargo-risk planning and assessment of reefer product insurance under the applicable policy terms.
Key Takeaways
- Separate visible signs on the meat from what temperature records establish.
- Preserve reefer settings, alarms, temperature logs, and transit records before unloading or handling changes the evidence.
- Use the frozen meat cargo defrosting and refreezing transit claim inspection checklist to organize observations and identify gaps without assuming a cause.
- Record when and where the condition was discovered, and handle sampling or testing under applicable protocols and qualified instructions.
- Build a chronological claim file, then assess the facts against the applicable policy wording and claim requirements.
Frozen Meat Defrosting in Transit: What the Inspection Must Establish
Suspected thawing and refreezing is an inspection concern, not proof of when a temperature change happened, what caused it, or who was responsible. Build a record that keeps observation separate from interpretation. Note what the meat and packaging look like, what temperature records show, and what remains unknown. A visual inspection can describe condition, but it can’t replace a verified temperature history or determine food safety. Follow applicable local guidance and qualified instructions for handling or safety decisions.
Appearance alone cannot establish when a temperature excursion occurred. Packaging, cargo location, shipment events, and reefer records each provide a different piece of the timeline. This evidence-first approach supports a clearer frozen meat cargo defrosting and refreezing transit claim inspection. For broader context, cold chain management relies on coordinated conditions across storage and transport, not one isolated reading.
What can visible signs of thawing and refreezing tell an inspector?
Record details without labeling them as proof. Note ice crystals, softened areas, deformation, leakage, and torn or wet packaging. Describe each carton’s location, such as near a door, wall, or central pallet, and note whether nearby cartons show similar signs. Photograph representative examples and affected areas before moving the load. Include a scale or identifying label where practical, and retain original files with their timestamps.
- Describe the condition and location, rather than writing “unsafe” or “refrozen” as a conclusion.
- Capture both close-up details and wider views showing where affected cartons sit in the load.
- Record damaged packaging and visible product changes as separate observations.
A single sign can have more than one explanation, and a lack of obvious damage doesn’t establish that temperatures stayed stable. Treat appearance as a lead for further review, not a verdict on duration, cause, or safety.
Why does the shipment timeline matter?
Build a sequence from the records available. Distinguish the time the cargo was inspected from the unknown time a problem may have started. Include transfers, delays, delivery, and discovery, then compare those events with reefer settings, alarms, power interruptions, and temperature records. Document any gap in the timeline instead of filling it with an assumption.
- Record pickup and dispatch details.
- Add transfer points, delays, and changes in custody.
- Note delivery and the exact time and place the condition was discovered.
- Compare these events with equipment and temperature records, marking missing periods clearly.
For example, a damaged carton found at delivery establishes its condition at inspection, not when the damage began. A temperature record may help narrow the period, but its value depends on what it measures and how it aligns with shipment events. Consider the wider cold-chain risks described in this reefer cargo insurance guide. Consistent observations and time-linked records give reviewers a clearer basis for assessing what the evidence supports and what it cannot establish.
How to Preserve Temperature and Reefer Evidence Before Unloading
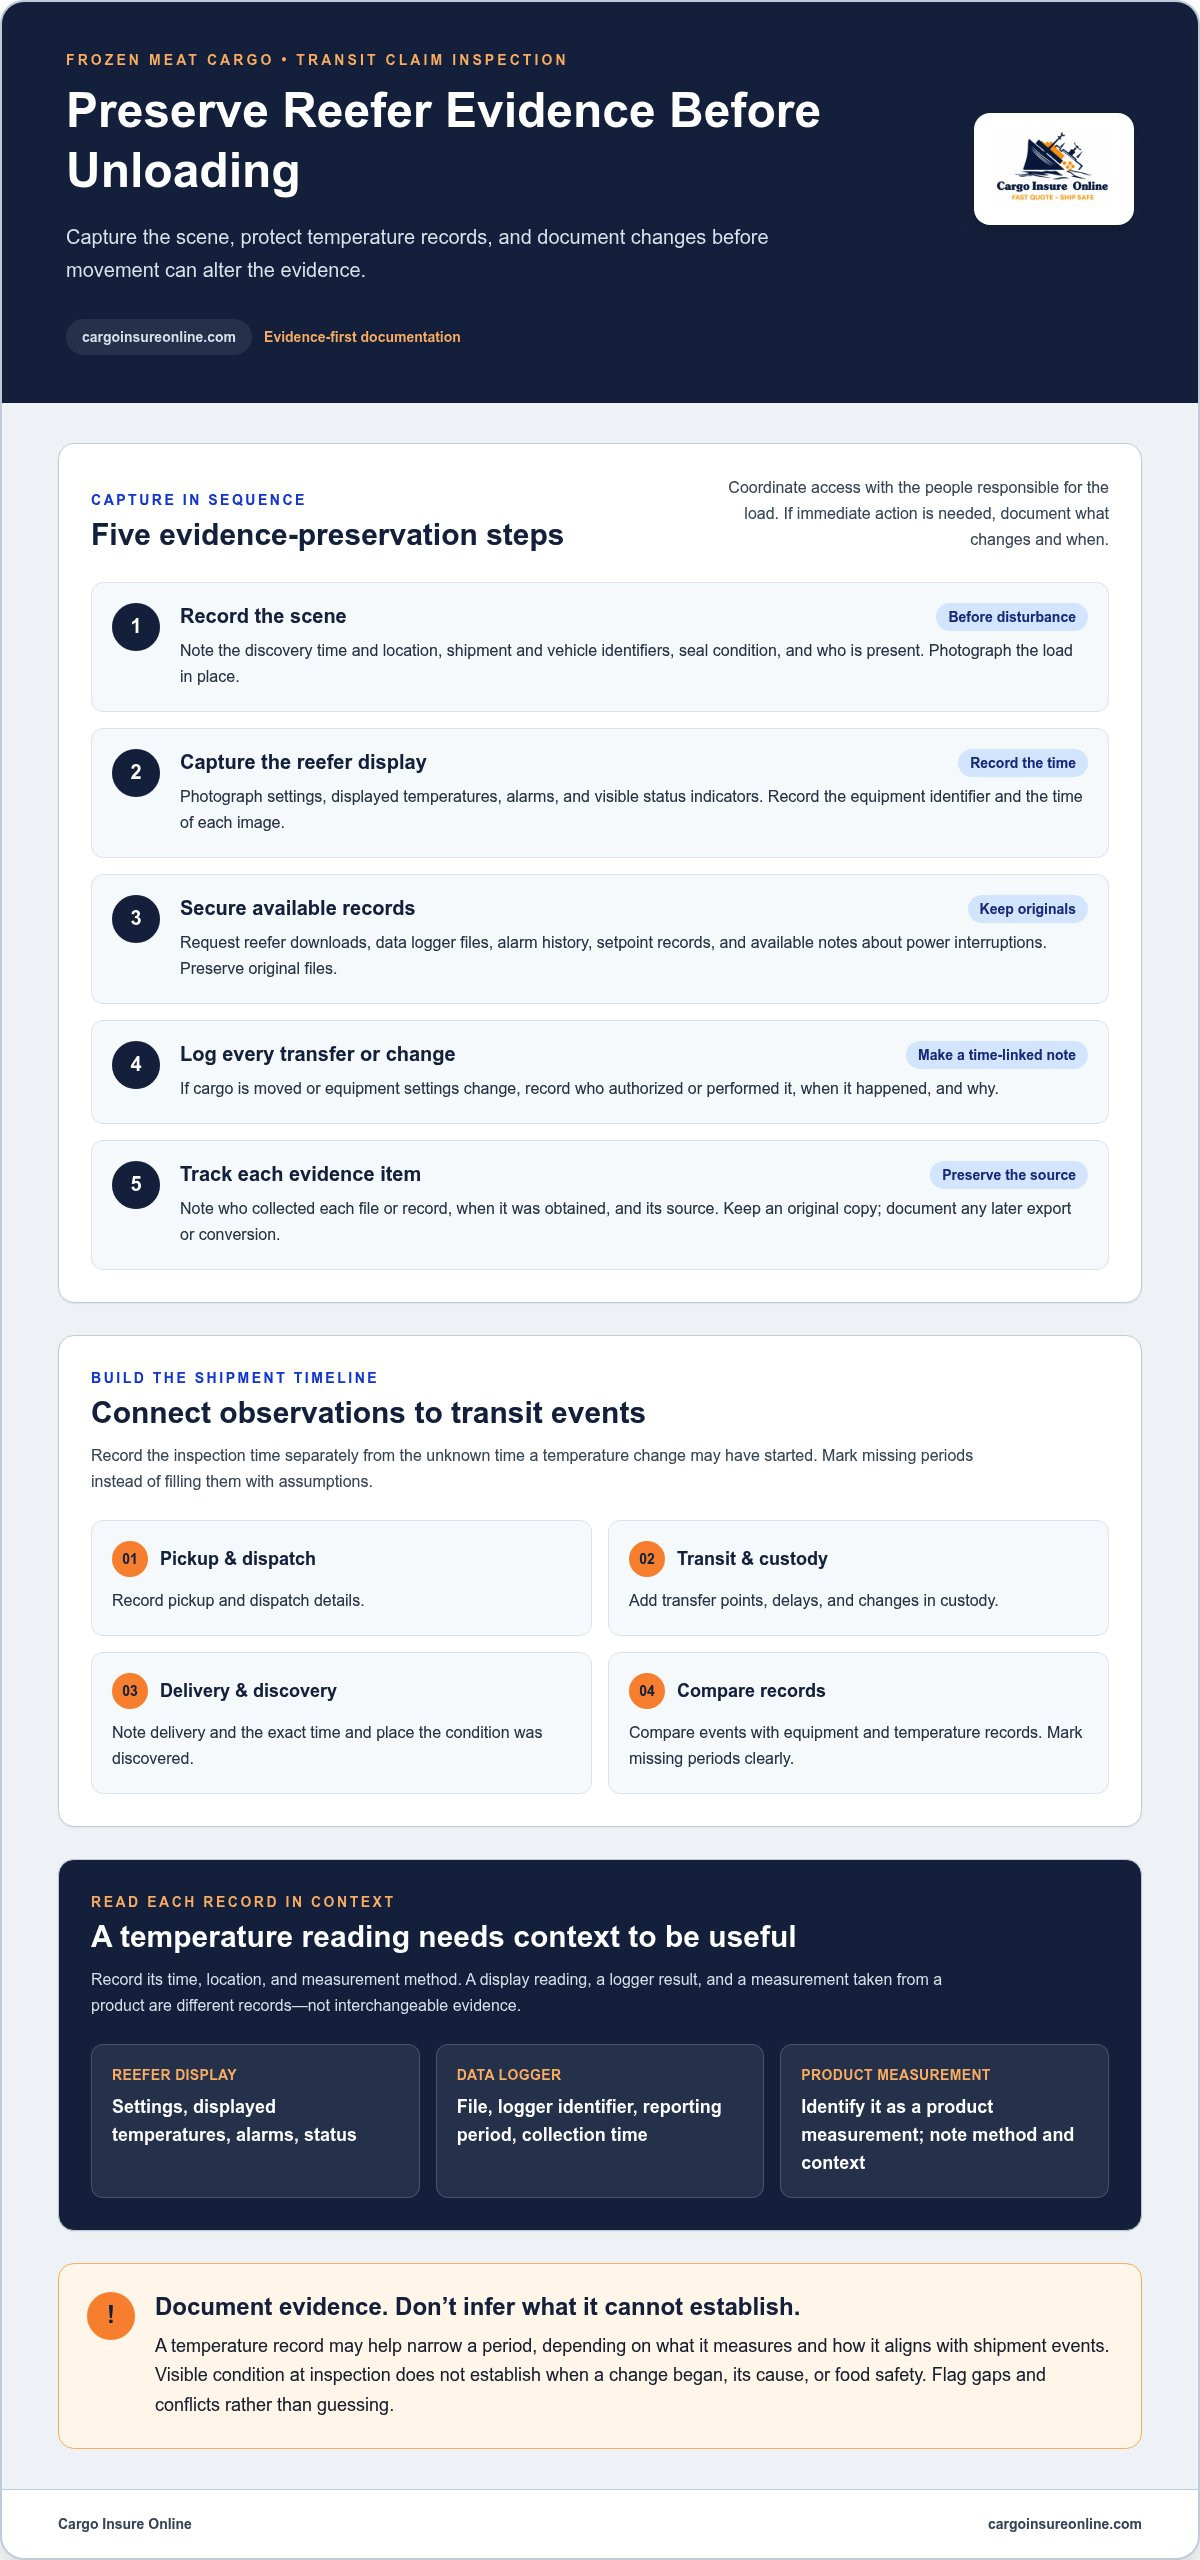
Before cargo is unloaded, rearranged, or discarded, capture evidence that movement can erase. Start promptly, coordinate access with the people responsible for the load, and keep the record factual. If immediate action is needed to protect people or cargo, document what changes and when rather than delaying necessary steps.
- Record the scene. Note the discovery time, location, shipment and vehicle identifiers, seal condition, and who is present. Photograph the load in place before disturbance.
- Capture the reefer display. Photograph the unit’s settings, displayed temperatures, alarms, and visible status indicators. Record the equipment identifier and time of each image.
- Secure available records. Request reefer downloads, data logger files, alarm history, setpoint records, and any available notes about power interruptions. Preserve the original files.
- Log every transfer or change. If cargo is moved or equipment settings change, record who authorized or performed it, when it happened, and why.
- Track each evidence item. Note who collected each file or record, when it was obtained, and its source. Keep a copy of the original and document any later export or conversion.
Speed matters, but clarity matters just as much. A temperature reading needs its time, location, and measurement method to be useful. A display reading, a logger result, and a measurement taken from a product are different records. Identify which one you have; don’t present them as interchangeable.
Which reefer and temperature records should be collected?
Gather available reefer downloads, data logger files, alarm history, and setpoint records. For each item, note the unit or logger identifier, reporting period, collection time, and who supplied it. Preserve the original file and keep a separate working copy if you need to review or share it. If a record has missing intervals or conflicts with another reading, flag the discrepancy rather than filling gaps by inference.
A file’s time range helps show what it does and doesn’t cover. For example, a logger may begin recording after pickup, while a reefer report covers a different span. Record those boundaries so reviewers can compare sources without assuming they describe the same period.
How should the first inspection be documented?
Photograph the load, seals, packaging, reefer equipment, and thermometer displays before anything is moved. For each measurement, record the location, time, instrument used, and name of the person taking it. Include the surrounding context, such as whether a reading came from the unit display or a specific cargo location. These details help distinguish a direct observation from later interpretation.
For a road leg, connect the condition at discovery with available transport and equipment records. The trucking cargo insurance guide provides broader context for road-freight risk. This disciplined frozen meat cargo defrosting and refreezing transit claim inspection record also supports informed cargo-risk planning. Explore cargo insurance solutions as part of that planning.
How to Compare Product Findings, Temperature Data, and Possible Causes
No single record tells the whole story. Product condition describes what an inspector saw. Temperature data records what a sensor captured. Shipping and handling documents show movement and handoffs. Compare these evidence types side by side, while keeping their limits visible. In a frozen meat cargo defrosting and refreezing transit claim inspection, this separation helps prevent an observation from becoming an unsupported conclusion about cause or responsibility.
Physical observations
Photographs and inspection notes establish visible condition at a particular time and place. They may show softened areas, ice crystals, leakage, or packaging damage. They don’t establish how long a condition existed, when it began, or what caused it. Appearance alone also doesn’t determine product safety.
Temperature records
Reefer reports and logger data show the conditions recorded by particular equipment or sensors during the period represented. Their meaning depends on sensor location, reporting interval, equipment identity, and whether records have gaps. A reading from one point in a load may not describe every carton or reveal the cargo’s full temperature history.
Handling and transit records
Dispatch documents, transfer records, delay notes, delivery paperwork, and receiver observations can help establish where the shipment went and when custody changed. They don’t necessarily show cargo temperature or prove that a handoff caused a change in condition. Treat them as timeline evidence, not temperature measurements.
What does each evidence source establish, and what does it not?
Keep each finding tied to its source. A photograph supports “this carton appeared deformed at inspection,” not “the reefer failed.” A temperature log may show a recorded change, but its location and time range matter. A delivery record can anchor a handoff without revealing what occurred inside the trailer. Refreezing, if it occurred, doesn’t restore the cargo’s prior condition or prove when a temperature excursion began.
Possible explanations such as equipment malfunction, a delay, loading conditions, or handling should remain hypotheses until records support them. Don’t select a cause simply because it seems plausible. Instead, note what evidence would be expected if that explanation were correct, then compare it with the available timeline, equipment records, and inspection findings.
How can an inspector organize competing explanations?
Build one event timeline and place alarms, transfer records, photographs, and receiver notes against it. Label each entry as a confirmed record, a reported statement, or an unverified hypothesis. If a driver reports a power interruption, for example, record who made the statement and when. Don’t present it as confirmed unless supporting evidence is available.
Cause assessment is strongest when independent records align on timing. If they don’t, preserve the disagreement and identify what is missing. A clear account of supporting evidence and unresolved gaps gives claim reviewers a fairer basis for assessment than a single assumed explanation.
Frozen Meat Transit Claim Inspection Checklist: Report, Sample, and Protect the Record
A clear inspection record is built step by step. Secure the remaining evidence, report what was found, and document decisions that change the cargo’s condition. This frozen meat cargo defrosting and refreezing transit claim inspection checklist helps keep observations, statements, and conclusions distinct as you prepare records for claim assessment.
- Stabilize and identify the load. Keep affected cargo identifiable and separate from unaffected units where practical. Record any movement or change in storage conditions.
- Notify relevant parties. Share the discovery with the appropriate shipment, carrier, receiver, and insurance contacts. Keep copies of notices and replies, and follow applicable policy and claim requirements.
- Record what you found. Note the discovery time and location, visible condition, affected cargo units, and who was present. Preserve dated photographs and inspection notes.
- Control sampling and testing. Don’t take samples casually or discard test material. Follow applicable protocols and qualified instructions, documenting who collected each sample and how it was handled.
- Track every disposition decision. Record any segregation, salvage, or disposal, including the decision-maker, time, affected units, and supporting basis.
What should the initial loss report include?
Make the first report factual and easy to match to the shipment. Include shipment identifiers, the parties involved, route, delivery details, discovery time, observed condition, and the quantity known or estimated to be affected. Attach dated photographs, available temperature records, inspection notes, and transport documents. Mark estimates as estimates. State what remains unknown, then update the file as new records or findings arrive.
A precise report avoids turning a suspicion into a finding. For example, describe cartons as “softened at inspection” rather than declaring that they thawed at a particular point in transit unless evidence supports that timing.
How should sampling, salvage, or disposal decisions be recorded?
For each action, identify who authorized it, when it occurred, and which lots, pallets, or cartons were affected. Preserve laboratory results, sample identification and chain-of-custody records, and available salvage or disposal documentation. Record the reason given and any instructions relied on. Don’t declare cargo edible, compliant, or suitable for resale based only on appearance or an informal opinion.
Organize the claim file so another reviewer can follow the sequence without reconstructing it from scattered messages. Group records by type and date:
- Shipment, route, transfer, and delivery documents
- Reefer records, temperature data, and relevant equipment information
- Photographs, inspection notes, sampling records, and laboratory results
- Notices, correspondence, and responses from relevant parties
- Quantity calculations, documented salvage value, and disposal records, where applicable
These records can support assessment, but they don’t determine coverage or guarantee a claim outcome. That depends on the applicable policy wording, facts, and claim requirements. For cargo-risk planning alongside careful inspection practices, explore reefer product insurance options.
Prepare the Cargo Claim File and Review Insurance Response Without Assumptions
A strong file lets a reviewer trace the shipment from dispatch to discovery and understand how the claimed loss was calculated. Arrange documents in date order, connect each inspection finding to its supporting record, and keep original files and communications. This final step in a frozen meat cargo defrosting and refreezing transit claim inspection supports a clear assessment without assuming that evidence of damage determines the insurance response.
What belongs in an organized frozen-meat claim file?
Start with a simple index. Give each item a date, description, source, and file name or reference number. If a document is pending, unavailable, or incomplete, mark that clearly rather than leaving an unexplained gap. Keep originals unchanged, and label working copies separately if you add notes or annotations.
- Policy and shipment references: the relevant policy details, shipment identifiers, route information, and records connecting the cargo to the insured shipment.
- Commercial and delivery documents: invoices, packing lists, bills of lading or other transport documents, proof of delivery, and available handoff records.
- Condition and temperature evidence: dated images, inspection reports, reefer downloads, data logger files, and records of measurements taken.
- Communications: initial notices, messages with shipment parties, responses, and a log of when each communication was sent or received.
- Loss calculation: a clear breakdown of affected quantities and the basis for claimed values, with supporting records and any documented salvage or disposal information.
Use the same shipment and cargo identifiers throughout the index. That makes it easier to connect a temperature record to the relevant transit period, or a photograph to the specific pallet or carton described in an inspection report.
Why does inspection evidence not guarantee insurance coverage?
Evidence can support that cargo was damaged without establishing exactly when the damage occurred, what caused it, who was responsible, or how the loss fits the insured terms. Those are separate questions. Assessment depends on the applicable policy wording, the facts of the shipment, and the policy’s claim requirements. An inspection record helps explain the event; it doesn’t predict the outcome.
Give notice promptly under the policy and retain copies of notices, replies, and any documents submitted. Keep the chronology current as additional temperature data, inspection findings, or correspondence arrives. If a record conflicts with another, preserve both and note the difference instead of silently choosing one version.
For future shipment-risk planning, explore cargo insurance solutions for air, sea, and trucking freight, including temperature-sensitive reefer products. Consistent recordkeeping and informed insurance planning help keep shipment facts and the claim file aligned.
Build a Stronger Plan for the Next Shipment
A transit claim can reveal where your documentation process needs more structure. Use that insight to strengthen recordkeeping before the next load moves: decide how shipment records will be gathered, retained, and connected to inspection findings. A consistent process makes it easier to explain what happened without asking one photograph or temperature reading to answer every question.
The frozen meat cargo defrosting and refreezing transit claim inspection checklist is a practical starting point, not a substitute for reviewing the policy that applies to a shipment. Submit claim notices on time under its requirements, and let the evidence and policy wording guide assessment rather than assumptions about the outcome.
For future risk planning, explore cargo insurance solutions across air, sea, and trucking freight, including options for temperature-sensitive reefer products. Explore cargo insurance solutions to take a clear next step toward more informed shipment planning.
Frequently Asked Questions
Can frozen meat be safely refrozen after it thaws during transit?
There’s no safe answer based on thawing and refreezing alone. Handling depends on the meat’s actual time-and-temperature history and the food-safety guidance that applies to the shipment. Refreezing or a normal appearance doesn’t establish safety. A transit inspection isn’t a food-safety clearance, either. Keep the affected lot identified while qualified food-safety personnel or the relevant authority advises on handling, testing, or disposal for the shipment’s jurisdiction.
How can an inspector tell whether frozen meat thawed and refroze?
An inspector can document signs that may be consistent with temperature change, but visual clues can’t confirm thawing and refreezing on their own. Compare findings across cartons and cargo locations, and note whether the same pattern appears in more than one area. The frozen meat cargo defrosting and refreezing transit claim inspection should distinguish these observations from verified temperature records. There may be no single visible marker that establishes the product’s full history.
What temperature records should be collected for a frozen meat cargo claim?
Collect available reefer downloads, logger files, alarm and setpoint history, and records of power interruptions. Check the reporting period and equipment or sensor identifiers for each file. For example, note whether a logger began recording after pickup or measured a different cargo location than the reefer unit. Preserve original files, record the time zone used, and flag gaps or conflicting readings rather than trying to reconcile them without evidence.
Should frozen meat be unloaded before a cargo inspection?
Don’t unload solely to make inspection easier if the load can remain safely and operationally undisturbed. First document the cargo’s position and condition as accessible, then coordinate inspection and any necessary movement with the responsible parties. Unloading may be needed for safety, storage, or handling reasons. If so, record who authorized it, when it began, and which units moved, so later observations can be understood in context.
What documents are needed for a frozen meat cargo insurance claim?
Gather records that identify the shipment, show its value, and connect the reported loss to the cargo delivered. These may include the policy or certificate, commercial invoice, packing list, transport document, delivery record, claim form, inspection report, temperature files, and relevant correspondence. Reconcile the quantity claimed against the shipment documents, and explain any difference, such as cartons recorded as damaged, salvaged, or missing from the final count.
Does refreezing prove when or why frozen meat was damaged?
No. Refreezing doesn’t establish when a temperature change occurred or identify its cause. It describes a suspected product history, not the event that produced it. To assess timing, compare time-stamped records from different sources, such as equipment data, handoff documents, and discovery notes. If the records don’t align or leave a period unaccounted for, document that uncertainty instead of assigning a cause the evidence can’t support.
Will cargo insurance cover frozen meat that defrosted and refroze in transit?
Coverage can’t be determined from the fact of thawing and refreezing alone. The applicable policy wording, shipment facts, and claim requirements govern the assessment, so the outcome may depend on the event details and evidence available. Review the policy and provide notice in line with its requirements. Keep supporting records organized, but don’t treat an inspection finding as a promise that a loss is covered or will be paid.


